Training your model with the DEEP platform is now easier than ever.

The second DEEP release was recently published and it comes with plenty of new useful functionalities, all of them with the common goal of easing the path for the scientific communities to develop, build and deploy complex models as a service at their local laptop, on a production server or on a cloud infrastructure. One of the main novelties is that the platform now supports asynchronous training and allow to launch, monitor, stop and delete the training directly from the web browser in a transparent way. The prediction features were already introduced and explained in detail in a previous post. Now is the turn for a walk through the training functionalities of the DEEP platform  and the recent additions to improve the user interactivity. 

To make things easy, we have developed a platform allowing the user to interact with the model directly from the web browser. Let’s see how all this work!

In this post we will show how to train a model using the training dashboard. All the modules included in the marketplace are available from the dashboard. Let’s take as an example the image classifier. We are going to perform a new training to distinguisth between pictures of roses and daisies.

The data must first be uploaded to the storage system of your choice. For this example we will be using NextCloud, where we need to create a folder called dataset_files that must include two text files:

  • train.txt: containing the paths within NextCloud to the images to be used for the training followed by a number indicating the category of each image (0 or 1 in this case, since this is a binary classification)
  • classes.txt: containing the name of the different classes. In this case rose and asteraceae (the scientific name of the daisies).
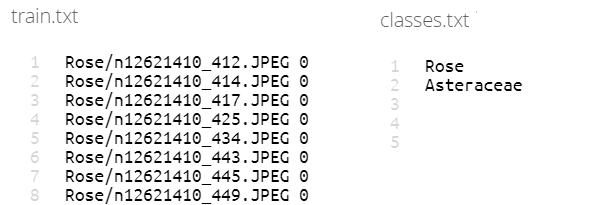
Example of the content of the train.txt and classes.txt files

Once we have our training data in place, we open the dashboard and browse the different models till we find the one titled “Train an image classifier”.

Then, we can just click on the Train module button. This will take us to a web form where we can specify the resources needed for the training: CPU or GPU, amount of memory or even the concrete site where we want to run in case we have a certain preference. We can also set the different identification parameters (ID and password) in order to access the storage system where we have our training data (NextCloud in this particular case).
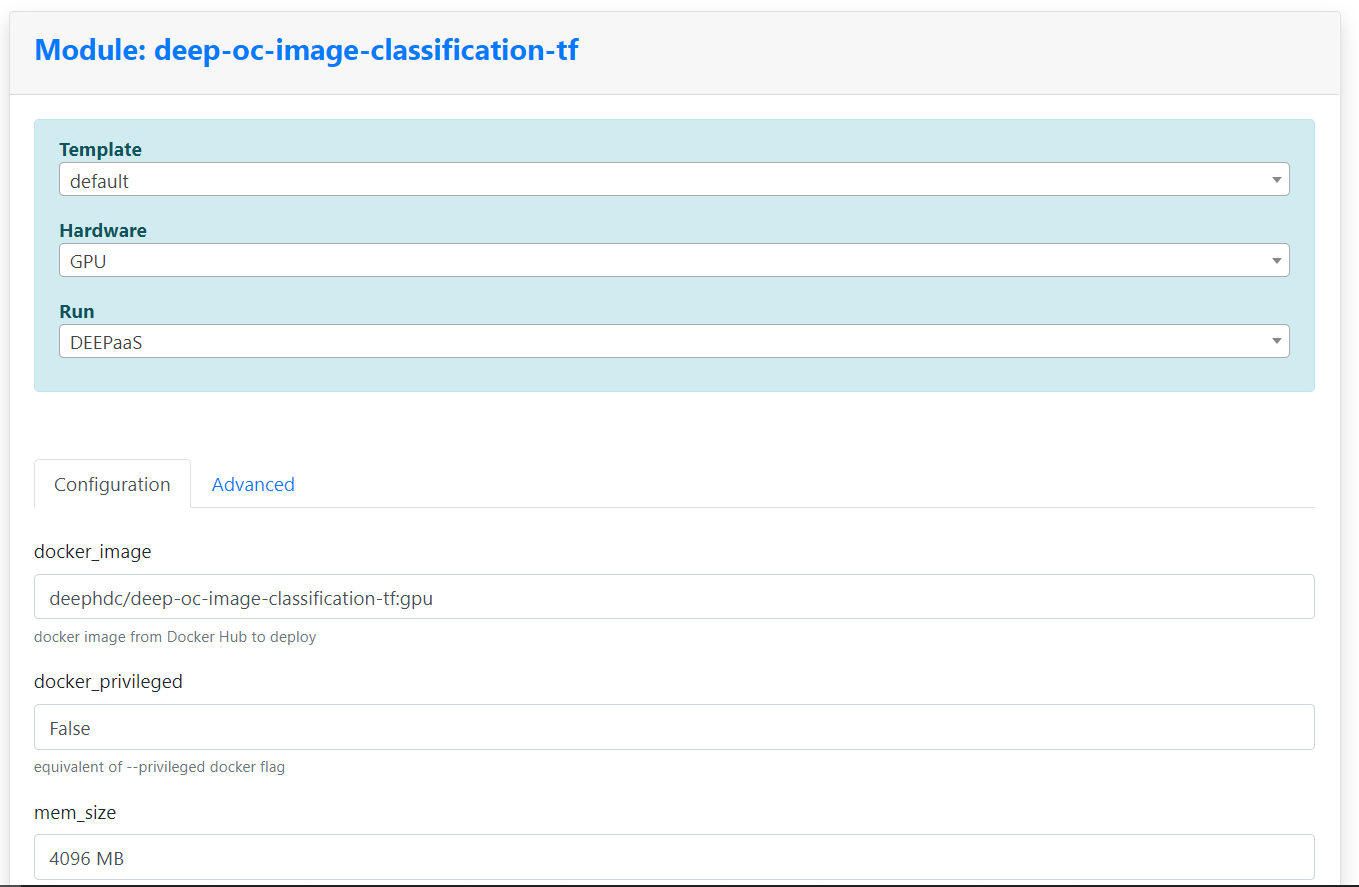
Form to be filled specifying the resources needed for the training

Once we have submitted the form, we are redirected to a dashboard showing us the status of our deployment.

Dashboard showing the status of our deployments

When the CREATE COMPLETE label appears, we can click on the Access menu and select DEEPaaS. This will open a new tab with a nice user interface allowing us to interact with the image classification model.

From this web user interface we can:

  • Check the model metadata and details
  • Retrain a certain model with our own data
  • Get the list of trainings currently running
  • Get the status of a training
  • Cancel the training
  • Make a prediction with a certain trained model
DEEPaaS web user interface. It allows checking the model metadata, launch and interact with the training and predicting using a trained model

If we click on the train button we can set the training options such as number of epochs, type of architecture, batch size, whether or not to use data augmentation or early stopping, among many others. Once we are happy with the training options we can launch it just by clicking on the Execute button.

During the training, we can monitor the learning metrics (accuracy and loss) using Tensorboard by clicking on the Monitor option from the deployment Access menu in the dashboard. This will open a new tab where we will see the following information:
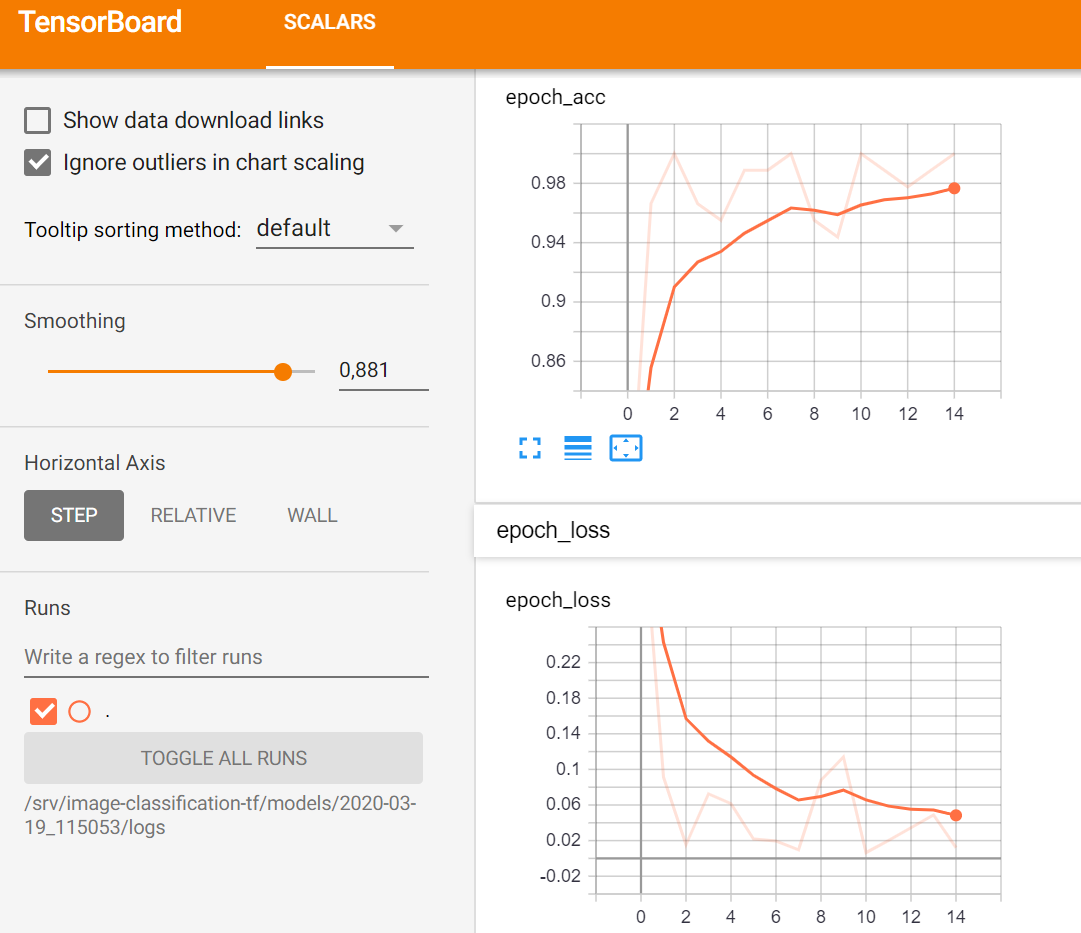
Monitoring of the training metrics using Tensorboard

As mentioned earlier, the main change in this new release is the asynchronous support for training. This means that you do not have to wait for the training to finish in order to continue using the web user interface. For example you can launch a training and, while you wait for it to finish, you can immediately do predictions on a previously trained model or close the browser and come back later.

Also, you can check the status of your training or even DELETE it by using the identifier provided when the training is created (UUID). For instance, let’s see what is the current status of our image classification training from the web user interface by using the UUID:
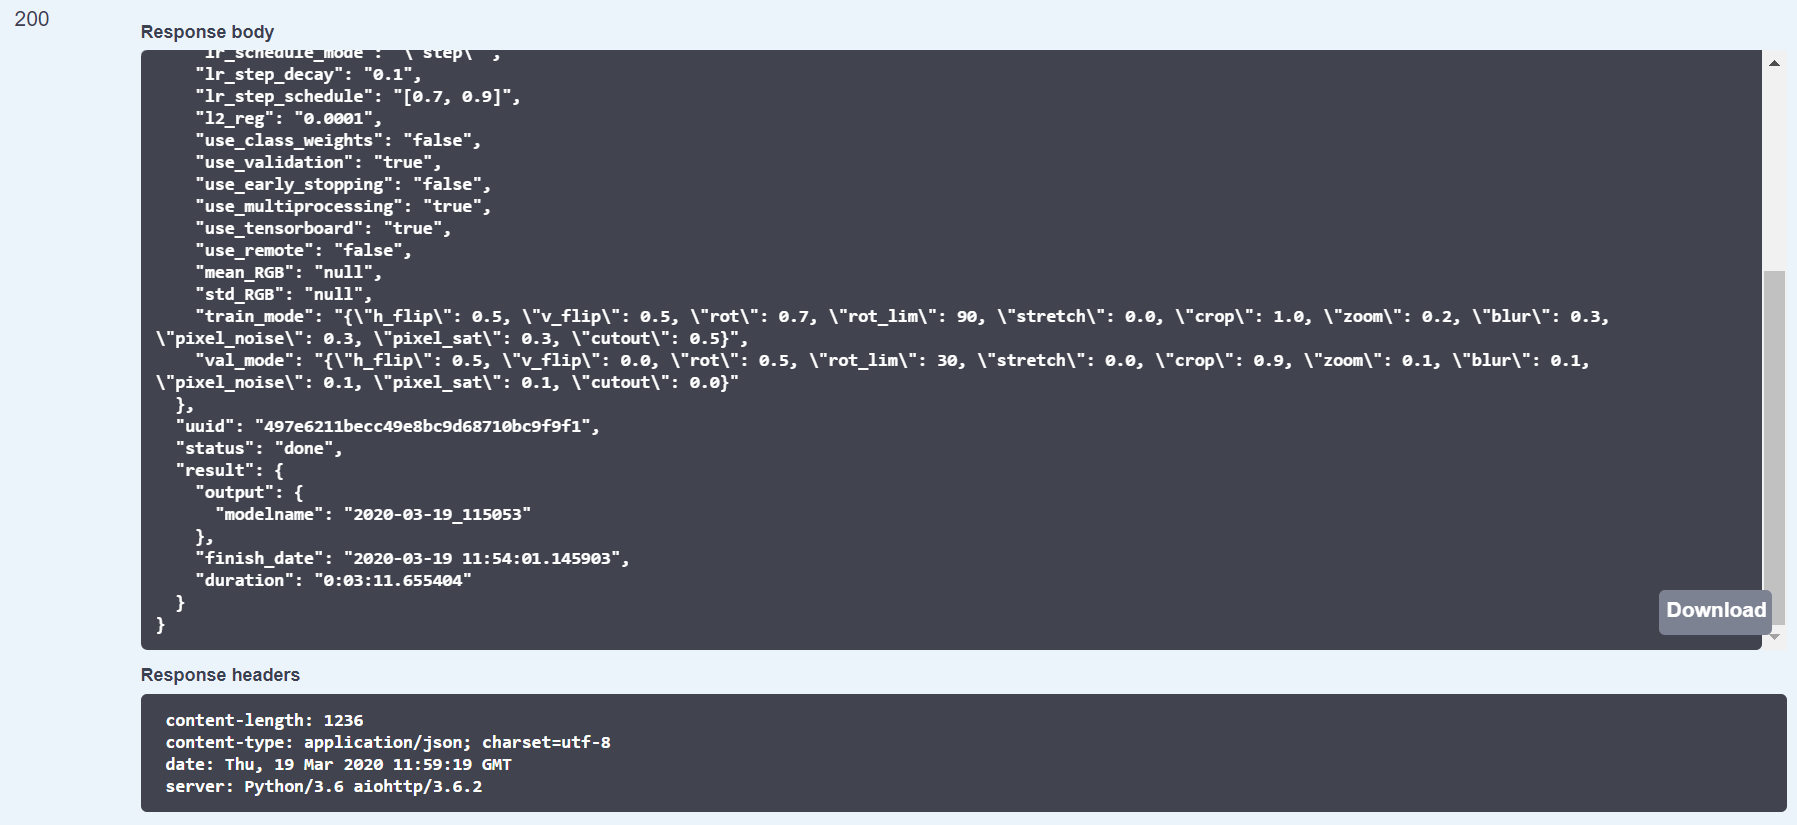
Monitoring the status of the training. We can see that the training finished (status: done) and also some additional information about it (duration, finish date, etc…)

Another useful feature in this new release is the ability to store the history of all the performed trainings. This allows to monitor the status of your training directly from the training Dashboard.
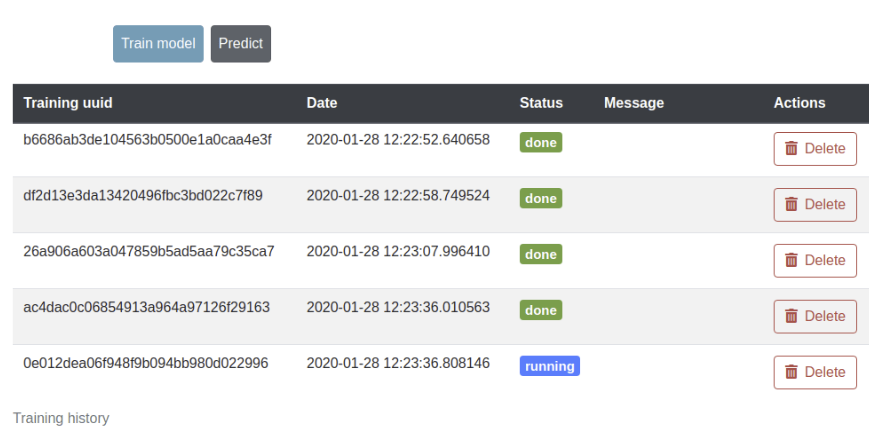
Monitoring the status of your training from the training dashboard

Once our training is over, we can use the web user interface to perform some prediction with our brand new model. Let’s use the image of a daisy that we found in internet:
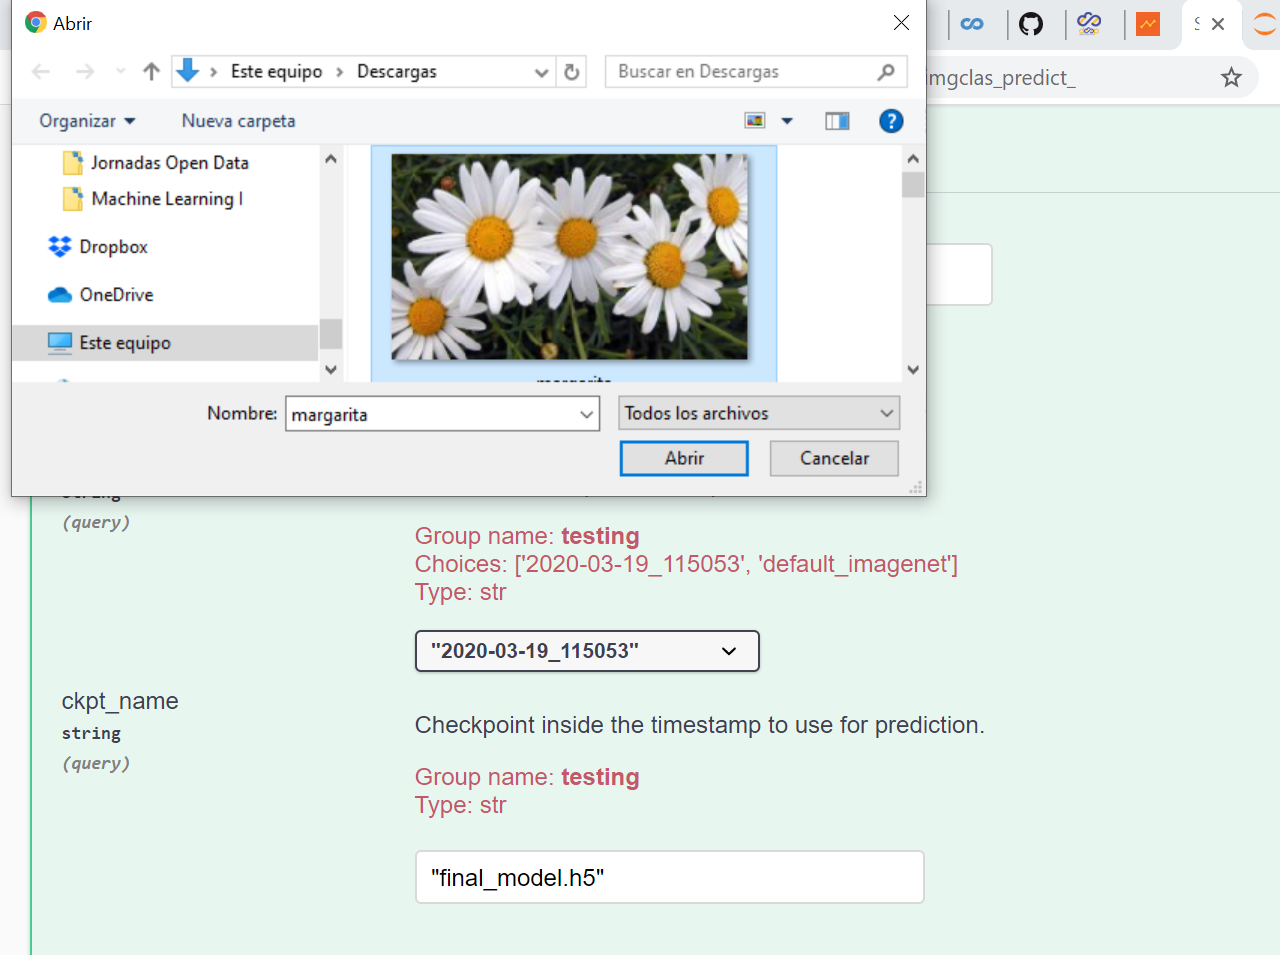
Prediction with the new trained model

The prediction output looks like this:
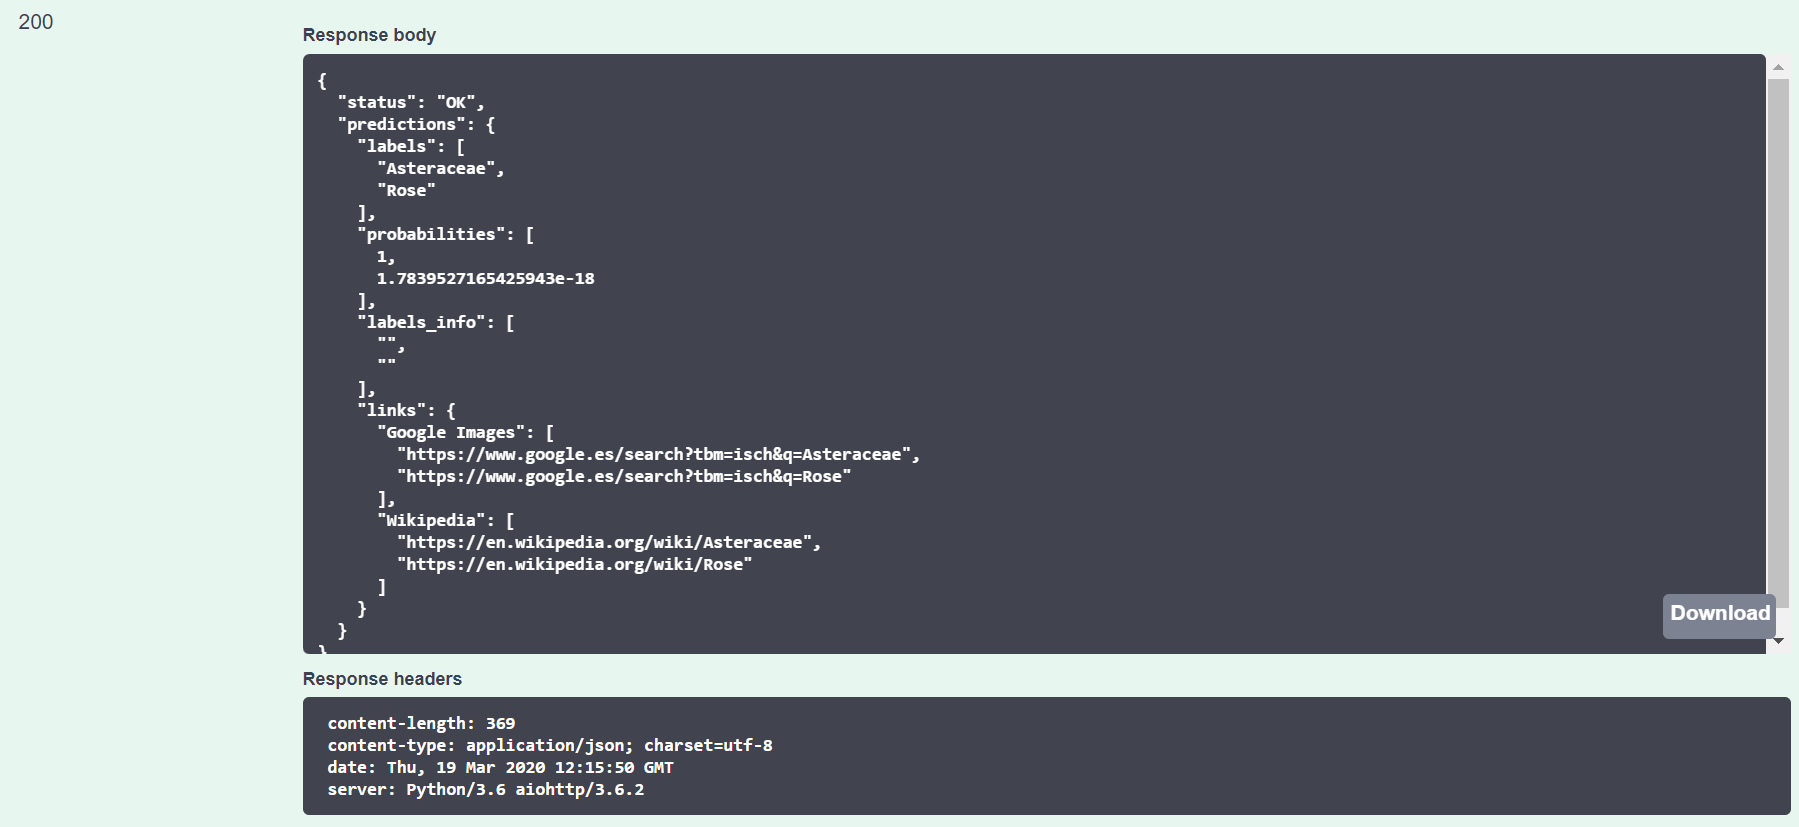
Prediction output

We can see that the prediction is correct! Our image is predicted as a daisy with a probability of 100%.

In this post we have seen how to browse a model from the DEEP Open Catalog, train it with our own data, monitor the training and do some prediction with our new trained model. Everything from the web browser!

Soon, another post from this saga on how to use the development docker with Jupyter. Stay tuned!

DEEP Marketplace

We are glad to present an open ecosystem to foster the exchange of machine learning modules in the scientific community: the DEEP Marketplace. The catalogue includes all the applications developed in the DEEP Hybrid DataCloud project (DEEP), as well as external modules developed by users who want to share their applications and solution approaches within the AI community, thus promoting collaboration between research and development (R&D) groups.

The DEEP framework supports artificial intelligent modules, especially compute-intensive deep learning modules over distributed e-infrastructures in the European Open Science Cloud (EOSC) for the most compute-intensive tasks of the intelligent software development and deployment life-cycle phases. Moreover, the DEEP Open Catalogue (available in DEEP Marketplace), DEEP as Service solution and DEEP learning facilities are in connection with the EOSC storage and data services, which allow to easily share, publish, exchange, collaborate and deploy developed models as services. These, in turn, support Open Science in which transparency and reproducibility of computational work are important.

DEEP use cases as deep learning modules are publicly available as Open Source in the DEEP Open Catalogue and publicly accessible in the DEEP Open Market. They are categorized in the following main extendable groups:

  • Earth observations: deep neural network applications to perform pattern recognition on satellite images. They can be combined with other in-situ measurements for ecosystems and biodiversity to perform tasks such as remote object detection, terrain segmentation or meteorological prediction. Currently we offer a super-resolution module to upscale low resolution bands to high resolution for the most popular multispectral satellites from all around the world.
  • Biological and medical science: deep learning modules for biomedical image analysis have opened new opportunities in how diseases are diagnosed and treated. We currently provide a retinopathy automated classification based on color fundus retinal photography images.
  • Cyber-security and network monitoring: we provide modules with co-functions enhancements for surveillance Intrusion Detection Systems supervising traffic network flows of computing infrastructure. 
  • Citizen science: deep learning modules for leveraging citizen science in large-scale biodiversity monitoring. The available modules include automatic identification of species from images for a wide range of categories (plants, seeds, conus and phytoplankton). Most of these modules are also available as mobile applications.
  • General purpose: this includes modules that can be used across a wide range of domains. We currently provide modules for image classification, audio classification, speech-to-text synthesis and pose detection.

These groups are open extensible categories, which offer flexible way for adding new and interesting applications to be presented in the DEEP Marketplace for wide and public audience.

Figure 1. A snapshot of the application catalogue.

All modules in DEEP Open Catalogue is categorized by name and by tags like #tensorflow, #keras or #docker with upcoming full-text search capability. For every module a set of metadata entries are provided. The full list of metadata entries includes:

  • Title
  • Summary

A quick one liner describing the module

  • Description

An extended description of what the module performs, what problem is it solving, what machine learning tools it is using, which data types it needs for prediction, etc.

  • Tags

These are the tags that are going to make the module more searchable. Tags usually refer to overall features or tools used in the module. 

  • License
    Under what license a module can be used, modified, and shared.
  • Creation date
  • Cite this module” – URL for citation (for modules based on a published paper)

URL pointing to the DOI of the paper

  • “Get this module” – URL for the module’s source code

This points to the source code that is used to run the application. If you plan to use the application (especially if you want to retrain it) it always good to have a look to the README in this repository as it is going to explain in detail what you need to successfully retrain the application.

  • URL for the module’s Docker image in Dockerhub

This is the Docker image of the module. It can be hosted in the deephdc organization or somewhere else.

  • URL for training weights of the module

This is usually a compressed file with all the info from the training (including the final weights). Together with the module’s code, it should be enough to reproduce any of the model’s functionality.

  • URL pointing to the dataset used for training

This points to the dataset used for training (for example ImageNet for some image classification modules)

Not all the modules need to define all the metadata fields. In the module’s page you will also see a small side panel with quick one-liner instructions on how to run the module with Docker and start making predictions: a simple example would be to run the Docker container locally and go to http://127.0.0.1:5000/docs in your local browser to interact with the API.

As you can see, we provide all the tools to make the code exportable to any platform as the code is completely open source and not linked to the DEEP infrastructure in any way. Any user can access the code of any application to modify it freely.

As explained in the documentation modules in the Marketplace modules are intended for two purposes:

  • So that a user uses a module “as it is” for prediction.
  • So that the user finetunes the module to a specific task. For example users reuse the image classification module to train a classifier for x-ray scans.

Sometimes users will find that their task requires code that is not present in any of the available modules’ functionalities. So users can develop their own custom code from scratch using the DEEP template if they want to, or starting from another module’s code as all modules have Open Source  Licenses. Once users have their new module developed to perform the desired task they can request to upload it to the Marketplace to share it with the community. For detailed up-to-date instructions on all these steps please visit the DEEP documentation.

So, with all of this, we have covered the basics of the Marketplace:

  • How to browse for modules
  • How to browse the metadata inside the module
  • How modules are structured: module’s code, container’s code, weights, etc.
  • How a user can deploy the modules either for predict or to retrain
  • How user’s can develop their own modules to perform a task that is not available in the Marketplace. These new modules can then be shared with the whole community.

Our Newsletter #1 is out!

The first Deep-HybridDataCloud Newsletter is out!

Take a look to the first issue of the newsletter here!

It includes:

  • An overview of the project including a summary of the main objectives and an introduction to some of the team members.
  • Software Quality
  • Alien4cloud for DEEP
  • Udocker: Docker for users with no privileges
  • Summary of past events and future events

Enjoy!

Hybrid Virtual Elastic Clusters Across Clouds

Virtual clusters provide the required computing abstraction to perform both HPC (High Performance Computing) and HTC (High Throughput Computing) with the help of a LRMS (Local Resource Management System), such as SLURM, to be used as a job queue, and a shared file system, such as NFS (Network File System).

Virtual elastic clusters in the Cloud can be deployed with Infrastructure as Code tools such as EC3 (Elastic Cloud Computing Cluster), which relies on the IM (Infrastructure Manager) to perform automated provisioning and configuration of Virtual Machines on multiple IaaS (Infrastructure as a Service) Clouds, both on-premises, such as OpenStack, or public, such as Amazon Web Services.

However, these virtual clusters are typically spawned in a single Cloud, thus limiting the amount of computational resources that can be simultaneously harnessed. With the help of the INDIGO Virtual Router, the DEEP Hybrid-DataCloud project is introducing the ability to deploy hybrid virtual elastic clusters across Clouds.

The INDIGO Virtual Router (VRouter) is a substrate-agnostic appliance, which spans an overlay network across all participating clouds. The network is completely private, fully dedicated to the elastic cluster, interconnecting its nodes wherever they are. The cluster nodes themselves require no special configuration since the hybrid, inter-site nature of the deployment is completely hidden from them by the vRouter.

In order to test the functionality of these hybrid virtual clusters, the deployment depicted in the figure below was performed:

First, both the front-end node and a working node were deployed at the CESNET Cloud site based on OpenStack. The front-end node includes both CLUES, the elasticity manager in charge of deploying/terminating nodes of the cluster depending on the workload, and SLURM as the LRMS. It also hosts the VRouter central point, which provides a configured VPN server. This is deployed through the IM based upon a TOSCA template that is publicly available. In case you don’t know, TOSCA stands for Topology Orchestration Specification for Cloud Applications and provides a YAML language to describe application architectures to be deployed in a Cloud. 

The deployment of the computational resources at the UPV Cloud site, based on OpenNebula, included a VRouter, in charge of establishing the VPN tunnel to the VRouter central point, which was used as the default gateway for the working node of the cluster. Seamless connectivity to the other nodes of the cluster is achieved through the VPN tunnels. Again, this is deployed through the IM based upon another TOSCA template.

Notice that the working nodes are deployed in subnets that provide private IP addressing. This is important due to the lack of public IP across many institutions (we were promised a future with IPv6 that is being delayed). Also, the communications among the working nodes in each private subnetwork do use the VPN tunnels, for increased throughput. 

Would you like to see this demo in action? Check it out in YouTube.

We are in the process of extending this procedure to be used with the INDIGO PaaS Orchestrator, so that the user does not need to specify which Cloud sites are involved in the hybrid deployment. Instead, the PaaS Orchestrator will be responsible for dynamically injecting the corresponding TOSCA types to include the VRouter in the TOSCA template initially submitted by the user. This will provide an enhanced abstraction layer for the user.

We plan to use this approach to provide extensible virtual clusters that can span across the multiple Cloud sites included in the DEEP Pilot testbed in order to easily aggregate more computing power. 

And now that you are here, if you are interested in how TOSCA templates can be easily composed, check out the following blog entry: Alien4Cloud in DEEP.

DEEP Webinar

Worried about the learning curve to introduce Deep Learning in your organization? Don’t be. The DEEP-HybridDataCloud project offers a framework for all users, including non-experts, enabling the transparent training, sharing and serving of Deep Learning models both locally or on hybrid cloud system. In this webinar we will be showing a set of use cases, from different research areas, integrated within the DEEP infrastructure.

The DEEP solution is based on Docker containers packaging already all the tools needed to deploy and run the Deep Learning models in the most transparent way. No need to worry about compatibility problems. Everything has already been tested and encapsulated so that the user has a fully working model in just a few minutes. To make things even easier, we have developed an API allowing the user to interact with the model directly from the web browser.

Quality software matters

This is true for any kind of software development effort, regardless of whether it is framed under a big collaboration project or consisting in a humble application created for a confined audience. Software quality assurance (SQA), manages the development lifecycle of a given software product with the ultimate, and apparently simplistic, aim to produce better software. This is by no means an easy task and particularly paramount in research environments. Accessible and quality source code is the cornerstone to reproducible research as it provides the logic by which scientific results are obtained.

Openness, sustainability, readability or reliability are characteristics commonly associated with software quality, thus they should always reside in the mind of the developer at the time of writing the code. Readable source code leads to a smoother maintenance and increased shareability. A piece of software can be better sustained if the owners foster open collaboration by e.g. adhering to open and free licenses and providing clear guidelines for external contributions. Hence, the chances of survival of a software solution don’t only depend on increasing the collection of capabilities it exposes to the end users, as it was traditionally perceived, but also in consolidating those already available features in order to improve its reliability, and thus, the user experience itself. We shouldn’t forget that in the present era of social coding, the popularity of the software is tightly coupled with its accessibility and active support through public source code hosting platforms. Additionally, the transparency in the development process (e.g. continuous integration, security assessment) is key to build trust in our users.

In the DEEP-Hybrid-DataCloud (DEEP) project we strongly support these premises when developing our own software. We follow and contribute to the base of knowledge of SQA-related best practices from the “Common SQA Baseline Criteria for Research Projects” community effort (see this link and this link), applying them not only for the development of the core infrastructure software, but also within the scientific use cases involved in the project. Based on these guidelines, our source code is publicly accessible through GitHub (both deephdc and indigo-dc), distributed under the Apache 2.0 license. We have implemented DevOps-compliant pipelines to drive the development of both core and user applications, isolating beta features, in order to maintain a workable, production version that is automatically distributed –and readily available for external trial– to community-based software repositories such as PyPI or DockerHub. Along the way, source code is verified — tested and peer-reviewed — for each change targeted to production and subsequently deployed in a preview testbed, where it is validated within the DEEP solution.

Different stages covered by the DevOps pipelines in DEEP-HybridDataCloud project

Nevertheless, our aim is to keep improving our current implementation and, in particular, investigating more consistent ways to validate machine learning applications and offer them in an inference as a service model through the extension of the current DevOps pipelines towards a continuous deployment approach. Our ultimate goal is to make quality-based machine learning applications readily available for public exploitation in the DEEP marketplace. Stay tuned!

udocker: Docker for users with no privileges

logo

udocker is a user tool to execute simple docker containers in user space, no root privileges required.

Containers and specifically Docker containers have become pervasive in the IT world, either for development of applications, services or platforms, the way to deploy production services, support CI/CD DevOps pipelines and the list continues.

One of the main benefits of using containers is the provisioning of highly customized and isolated environments targeted to execute very specific applications or services.

When executing or instantiating Docker containers, the operators or system administrators need in general root privileges to the hosts where they are deploying those applications or services. Furthermore, those are in many cases long running processes publicly exposed.

In the world of science and academia, the above mentioned benefits of containers are perfectly applicable and desirable for scientific applications, where for several reasons users often need highly customized environments; operating systems, specific versions of scientific libraries and compilers for any given application.

Traditionally, those applications are executed in computing clusters, either High Performance Computing (HPC) or High Throughput Computing (HTC), that are managed by a Workload Manager. The environment on those clusters is in general very homogeneous, static and conservative regarding operating system, libraries, compilers and even installed applications.

As such, the desire to run Docker containers in computing clusters, has arisen among the scientific community around the world but, the main issue to accomplish this has to do with the way Docker has to be deployed in the hosts, raising many questions regarding security, isolation between users and groups, accounting of resources, and control of resources by the Workload Manager among others.

To overcome the issues of executing Docker containers in such environments (clusters), several container framework solutions have been developed, among which is the udocker tool.

At the time of writing, udocker is the only tool capable of executing docker containers in userspace without requiring privileges for installation and execution, enabling execution in both older and newer Linux distributions. udocker can run on most systems with minimal Python versions 2.6 or 2.7 (support for Python3 is ongoing). Since it depends almost solely on the Python standard library, it can run on CentOS 6, CentOS 7 and Ubuntu 14.04 and later.

As such the main target of udocker are users (researchers) that want or need to execute applications packaged in Docker containers in “restricted” environments (clusters), where they don’t have root access and where support for execution of containers is lacking. udocker incorporates several execution methods thus enabling different approaches to execute the containers across hosts with different capabilities.

Furthermore, udocker implements a large set of commands (CLI) that are the same as Docker, easing the use of the tool to those that are already familiar with Docker. udocker interacts directly with the Dockerhub and run or instantiate images and containers in Docker format.

One of the features of the correct version is the ability to run CUDA applications in GPU hosts using official NVIDIA-CUDA Docker base images, through a simple options to set the execution mode to nvidia. Work is ongoing on the design to have MPI applications to be executed in the most easiest possible way.

udocker lives in this git repository, the Open Access paper can be found here. A slide presentation with details of the tool and a large set of examples can be found here

DEEPaaS training facility available in EOSC

Many research areas are being transformed by the adoption of machine learning and deep learning techniques. Research e-Infrastructures should not neglect this new trend, and develop services that allow scientists to employ these techniques, effectively exploiting existing computing and storage resources.

The DEEP-Hybrid-DataCloud (DEEP) is paving the path for this transformation, providing machine learning and deep learning practitioners with a set of tools that allow them to effectively exploit the existing compute and storage resources available through EU e-Infrastructures for the whole machine learning cycle. 

The DEEP solutions supporting machine learning and deep learning are now available in the European Open Science Cloud (EOSC) portal 

These solutions provide services that allow scientists to:

  • Build a model from scratch or use an existing one
  • Train, test and evaluate a model
  • Deploy and serve as a service (DEEPaaS)
  • Share and publish a model

The key technologies provided by the DEEP include:

  • Docker container based
  • Transparent GPU access
  • HPC integration
  • Serverless architectures
  • Transparent hybrid cloud deployments through PaaS layer
  • Marketplace containing existing models ready to use
  • Standard APIs for model training, testing and inference
  • Integration with EOSC data services

Alien4Cloud in DEEP

Alien4Cloud® is an advanced cloud management tool that aims at simplifying the composition (both visual and text), management (e.g. source storing/versioning/editing), handling, and deployment (deploy, undeploy, update) of cloud topologies described using the TOSCA specification language. Alien4Cloud® supports users (with different roles) who can utilize either basic TOSCA template components or full TOSCA template topologies to deploy their own cloud infrastructures.

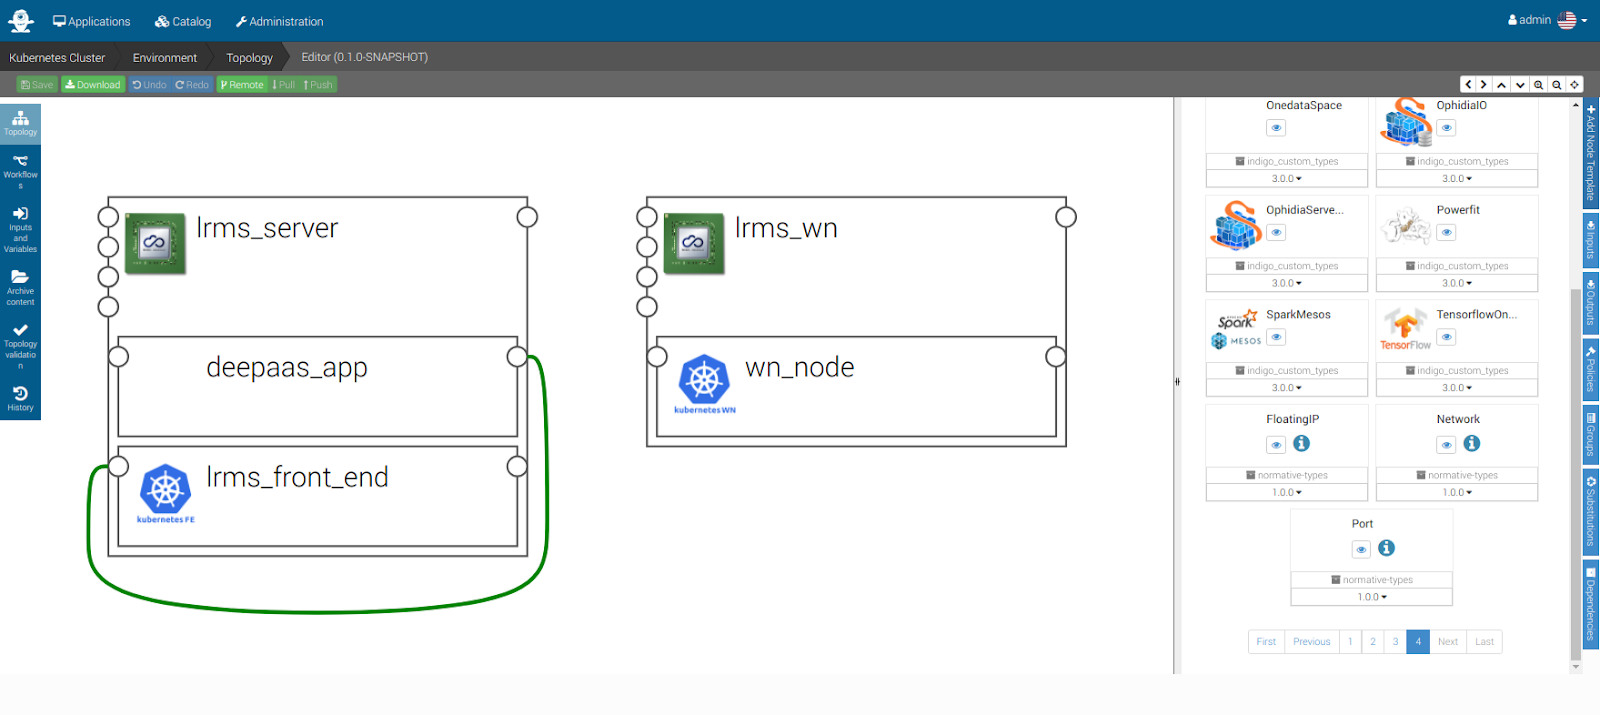
Alien4Cloud®'s TOSCA visual editor

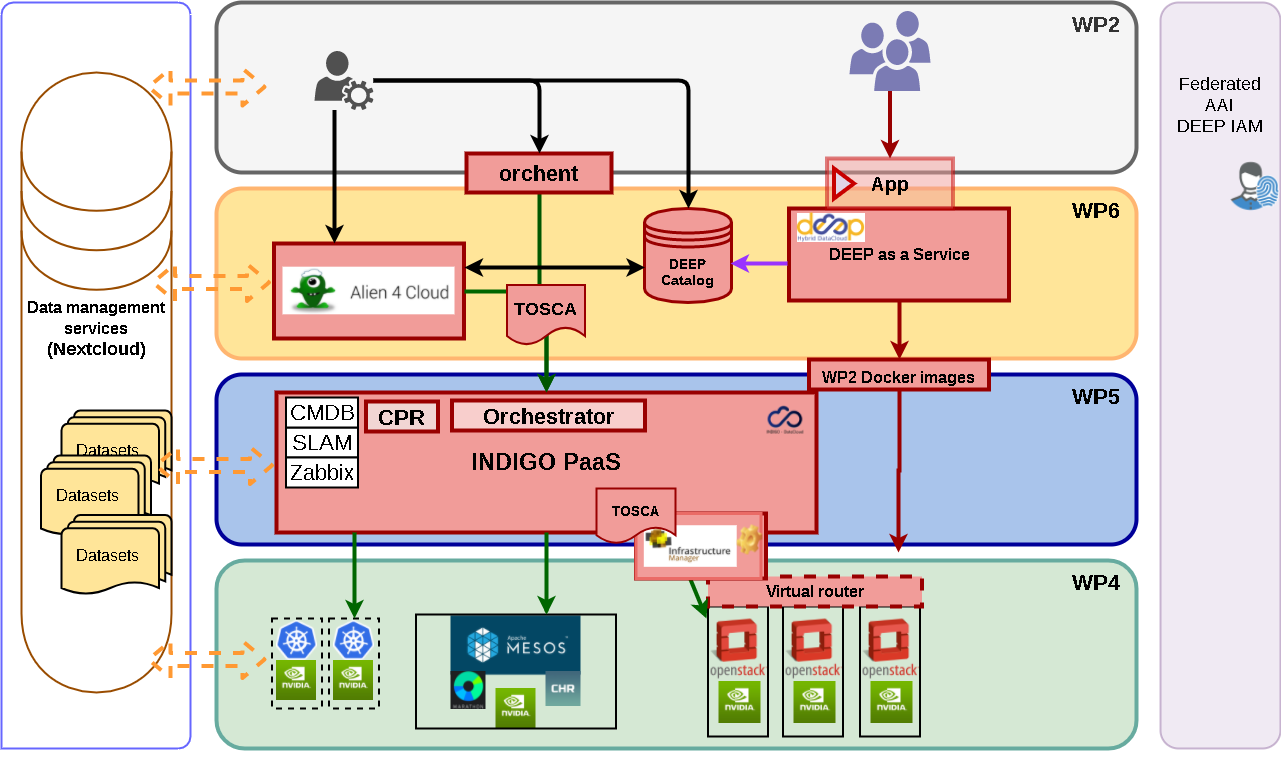
The DEEP Hybrid DataCloud project integrates Alien4Cloud® as the main component that allows our users to interact with the rest of the infrastructure. Figure F1 shows a custom infrastructure loaded from an existing topology template file that represents a small Kubernetes® cluster running the DEEPPaaS application. You can find more details about DEEP and the work being done at http://www.deep-hybrid-datacloud.eu. Diagram D1 depicts the role of the cloud management tool in the project. Alien4Cloud® is already a usable part of the project, please be sure you check our public demos on Youtube to see it in action.

The Alien4Cloud® role in DEEP

Since Alien4Cloud® allows functionality extension by the means of plugins, we developed one freely available on Github that connects it with the INDIGO PaaS Orchestrator used in DEEP. The Github repository doesn’t contain only the code for the orchestrator plugin, it also includes the Dockerfile necessary to create a Docker image (prebuilt at https://hub.docker.com/r/indigodatacloud/alien4cloud-deep) that includes all the components needed for deployment and use in DEEP:

  • Alien4Cloud, as of now our home baked version.
  • The INDIGO PaaS Orchestrator plugin.
  • The normative TOSCA types  adapted from Openstack’s version.
  • The custom TOSCA types created during the INDIGO-DataCloud project and being updated during DEEP.

If you find our project interesting, stay tuned for more. There are new and exciting features coming up. We are currently working on:

  • Extending the TOSCA support in the Alien4Cloud® parser, we plan to support normative TOSCA 1.2
  • Improve the user experience with the graphical TOSCA editor.
  • Integrate the TOSCA parser from newer Alien4Cloud® versions into the INDIGO PaaS  Orchestrator, with the normative support in both components, ensuring interoperability between the two components.

While you are here, you might want to take a look at a short video to help you get started with our Docker release (starting with the Docker image pull).

DEEP as a Service: Deep Learning for everybody

First part: Running a module locally for prediction

Deep Learning is nowadays at the forefront of Artificial Intelligence, shaping tools that are being used to achieve very high levels of accuracy in many different research fields. Training a Deep Learning model is a very complex and computationally intensive task requiring the user to have a full setup involving a certain hardware, the adequate drivers, dedicated software and enough memory and storage resources. Very often the Deep Learning practitioner is not a computing expert, and want all of this technology as accessible and transparent as possible to be able to just focus on creating a new model or applying a prebuild one to some data.

With the DEEP-HybridDataCloud solutions you will be able to start working from the very first moment!

The DEEP-HybridDataCloud project offers a framework for all users, and not just for a few experts, enabling the transparent training, sharing and serving of Deep Learning models both locally or on hybrid cloud system. 

The DEEP Open Catalog  (https://marketplace.deep-hybrid-datacloud.eu/, also known as “marketplace”) provides the universal point of entry to all services offered by DEEP. Its offers several options for users of all levels to get acquainted with DEEP:

  • Basic Users can browse the DEEP Open Catalog, download a certain model and apply it to some local or remote data for inference/prediction.
  • Intermediate Users can also browse the DEEP Open Catalog, download a model and do some training using their own data easily changing with the parameters of the training.
  • Advanced Users can do all of the above. In addition, they will work on more complex tasks, that include larger amounts of data.

The DEEP-HybridDataCloud solution is based on Docker containers packaging already all the tools needed to deploy and run the Deep Learning models in the most transparent way. No need to worry about compatibility problems, everything has already been tested and encapsulated so that the user has a fully working model in just a few minutes.

To make things even easier, we have developed an API allowing the user to interact with the model directly from the web browser. It is possible to perform inference, train or check the model metadata just with a simple click!

Let’s see how all this work!

In this post we will show how to download and use one of the available models from the DEEP Open Catalog in our local machine. These instructions will assume the user is running on linux but the docker containers can run on any platform.

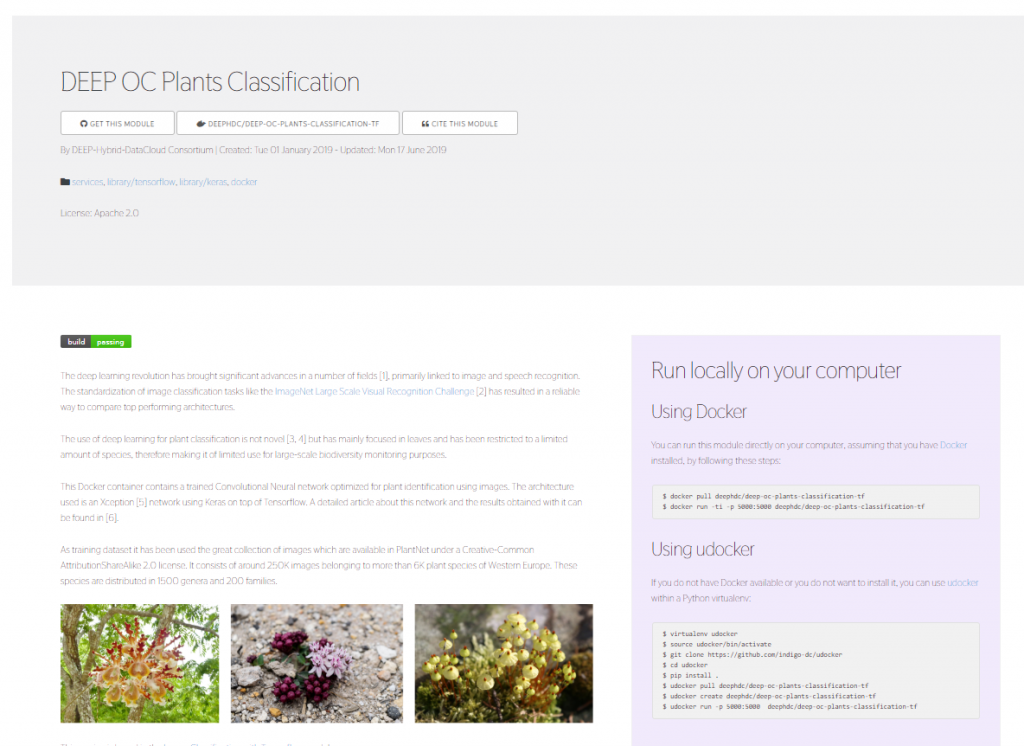
First we browse the catalog and click on the model we are interested in among the many that are already in place. Once we click on the model of our choice we will see something similar to this:

In this case we have selected a module classifying plant images according to their species using a convolutional neural network architecture developed in Tensorflow. Under the name of each of the modules in the DEEP Open Catalog we find some useful links:

  • Link to the GitHub repository including the model source code
  • Link to the Docker Hub repository of the docker containing all the needed software configured and ready to use
  • In case this is a pretrained model, a link to the original dataset used for the training.

Before starting we need to have either docker or udocker installed in our computer. We will be using udocker since it allows to run docker container without requiring root privileges. To install udocker you can just follow this very simple instructions:

 virtualenv udocker

 source udocker/bin/activate

 git clone https://github.com/indigo-dc/udocker

 cd udocker

 pip install .

We can now just follow the instructions on the right part of the module page and type the following commands:

udocker pull deephdc/deep-oc-plants-classification-tf

udocker run -p 5000:5000  deephdc/deep-oc-plants-classification-tf

This will download (pull) the docker container from Docker Hub and run it on our local machine. The run methods includes the option -p 5000:5000 which maps the port 5000 from our local server into the port 5000 in the container.

We have now the DEEP API running on our localhost!

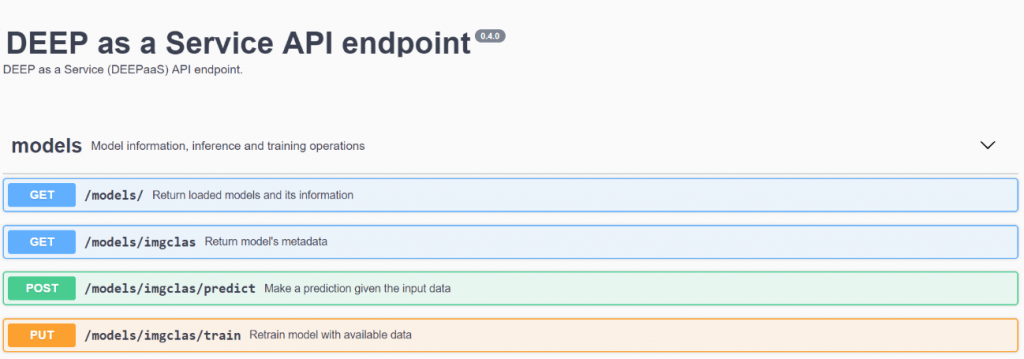
You can go to your preferred web browser and enter localhost:5000 in the address bar. This will open the DEEP as a Service API endpoint. It looks like this:

As you can see in the image different methods can be chosen. You can either return the list of loaded models (in this case we are just running the plant classification example) or the metadata of your models. You can also do some prediction on some plant image of your interest or even train the classification neural network on a completely new dataset. All this directly from your web browser.

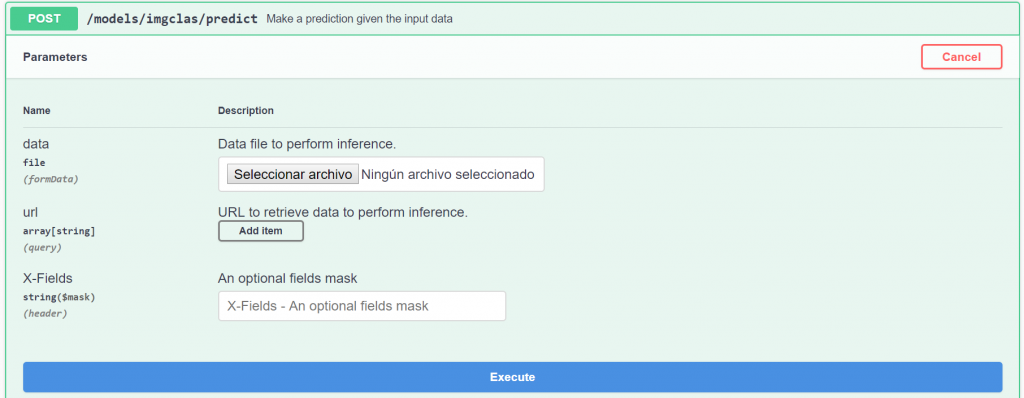
Let’s now try out the prediction method. We can either use a local file or the URL to some online plant image to perform the classification. For this example we will use a locally stored image.

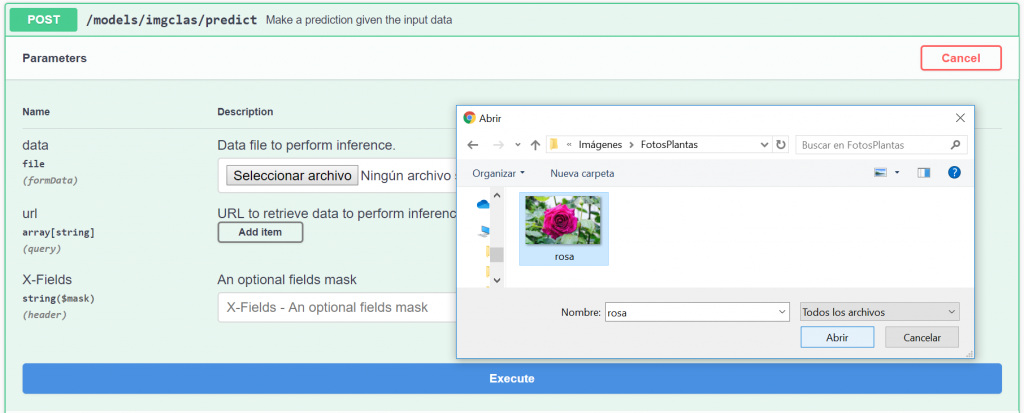
We click on Select File and browse our file system for the image we are interested in. In this case we will use the image of a rose. If you want to reproduce this example you can find the image here.

Now that we have selected the image we can click on Execute. The first time we perform a prediction with a given model the process takes a little while since the Tensorflow environment must be initialized. Afterwards, the prediction will be extremely quick (less than one second in many cases).

The prediction for our roses gives us the following output:

The result shows us the 5 most probable species. The most probable one is the Rosa Chinensis with a probability of 80%. Our module has predicted correctly! Together with the prediction we can find a link pointing to Wikipedia to check the species. 

The output is given in JSON format that can be very easily integrated with any other application needing to access the results.

In this example we have seen how to use one of the DEEP-HybridDatacloud modules running a Deep Learning model in just a few simple steps on our local machine.

If you want more detail, you can find the full documentation here.

In next posts we will see how to train a model using the DEEP API and how to run on a cloud system.  Stay tunned!